Calibrating your conductivity meter
When’s the last time you calibrated your conductivity meter? If it was more than a year ago, it’s time to calibrate it.
Our conductivity meters come pre-calibrated and ready to use! Your meter will need to be re-calibrated at least once a year. It’s helpful to set your calibration date before testing season, to ensure you are getting the most accurate results. Luckily, calibrating isn’t hard! Follow these easy steps or watch our ‘How to calibrate‘ video on YouTube.
The conductivity meter comes with the Compact Freshwater Testkit, the Freshwater Explore Testkit, and the Education Testkit.
You will need
- Your calibration solution
- Some distilled water*
- A cup/bowl
- A towel
- Your conductivity meter
*You can make your own distilled water on your stovetop. Watch this video for how
Our #1 tip
For best results, we recommend watching the “how to calibrate” video below! It’ll take you through the entire calibration process from start to finish. Still confused after you watch it? Contact us!
Step 1: Soak your meter in distilled water for 30 minutes. You can make your own distilled water or buy some from the store. It’s important to use distilled water because it has a conductivity of zero which is helpful when calibrating. Filtered water cannot be used as a replacement.
Step 2: After the 30 minute soak, take your conductivity meter out of the water and dry it with a towel (you can use the towel that comes in your testkit).
Step 3: Take your calibration solution pouch and warm it between your hands for a few minutes. The solution works best when it is between 23℃ and 28℃.
Step 4: The calibration pouch is filled with a saline solution. Using scissors, cut along the marked spot at the top of the pouch. Ensure that the pouch remains in an upright position during this step to prevent spillage
Step 5: Press the power button on your meter and then place the meter inside the pouch. Wait for the reading to appear on the meter. Make sure your conductivity meter is in μs (microsiemens).
Step 6: Press and hold the down arrow (the middle button) for two seconds until “CAL” appears.
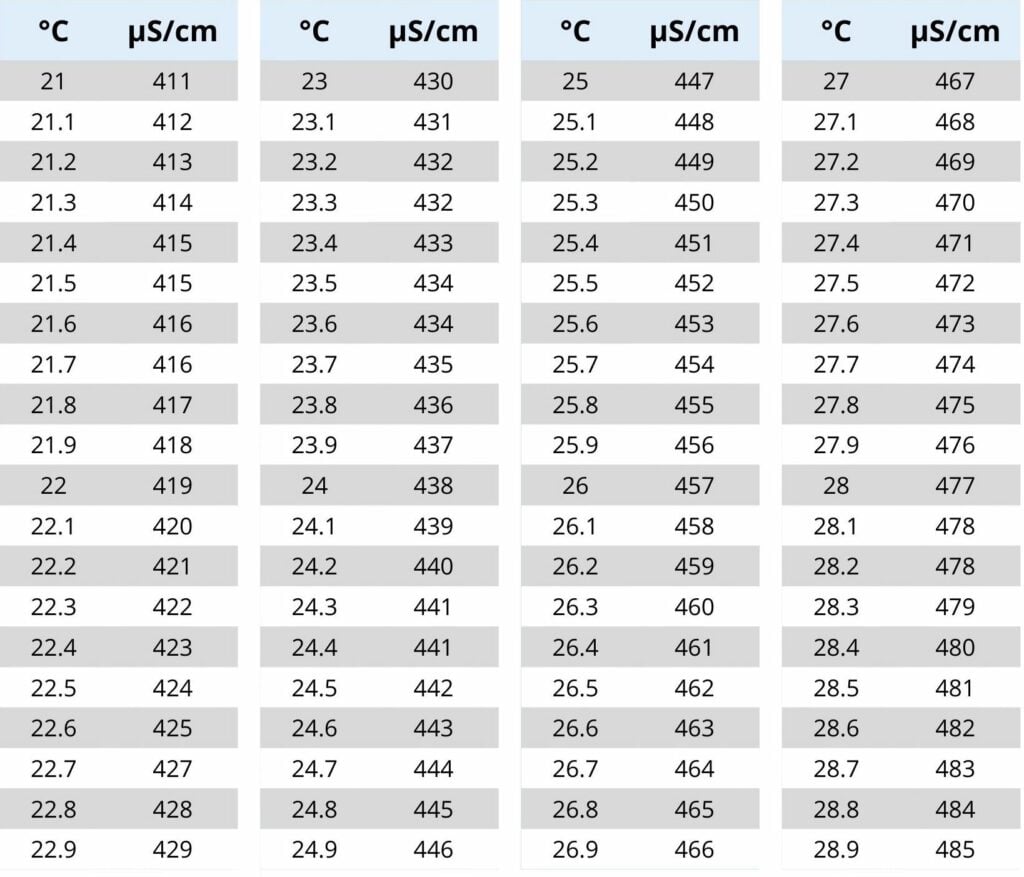
Step 7: Using the temperature correction chart below or on the back of the pouch, adjust the value to match the temperature of your solution. You can lower or raise the number by pressing the up and down arrows (the bottom two buttons) on your conductivity meter. For example, if your conductivity meter reads 25℃ then you would adjust the reading to 447μs/cm.
Step 8: Press the power button once to set the new reading.
And that’s it! You have now successfully calibrated your conductivity meter! Happy testing!
Temperature correction chart
Adjust the value to match the temperature of your solution. For example, if your conductivity meter reads 25℃ then you would adjust the reading to 447μs/cm.
How to calibrate
Ask an expert: Conrad Gregoire, Chemist, walks us through how to test and use a reference to make sure our readings are accurate!
Common problems
Calibration cycles back up to 600 and something? When calibrating, it usually tries to detect the calibration range and sometimes it gets it wrong and it’s cycled it to the highest point of that range. Press the up button to get the lowest value in that range Usually, by warming up your solution to around 27-28 degrees celsius (using your hands), you can get it in the 470s, for example, and calibrate it correctly.
See a reading of 5 or less? This is not possible in freshwater systems. Check that the probe portion is in the water when taking readings.
See a decimal reading (like 1.3)? Check the units! Typically, you should see μs/cm (microsiemens) on your screen, but sometimes the probe will measure in mS/cm (millisiemens). If this happens you must multiply 1.3 (your reading) by 1000 and record 1300 as your reading.
I pressed buttons, now it’s in some weird mode! The easiest way to fix this is by twisting the top off, removing one battery, putting the battery back in, and then turning the conductivity meter back on.
I’m getting ERR or out of range! This is for freshwater. Rinse the probe with tap or distilled water. Your probe could be damaged and in need of replacement.
Taking care of your meter:
To preserve the life of your conductivity meter, rinse with tap or distilled water after every use. You should also calibrate your device before every season or if you suspect damage.